Showing posts with label tutorial. Show all posts

Wednesday, May 2, 2012

DIY Mass Bag


Do you have trouble getting your kids to behave during Mass? I do! Although my children are 6, 8 and 12, I have a very hard time with my two youngest boys. It doesn't help that they have both been diagnosed with ADHD and I am the only church-attending parent.

With all of these hindrances, there have been days that I wanted to throw my hands up and retreat. Until I discovered the idea of Mass Bags, that is.

While perusing the internet, I saw some great ideas for "Busy Books" and things generated by LDS moms and I realized that they are on to something. I continued to read blog posts about these ingenious inventions and knew I needed something like this for use with my own boys.

My children are older than most children who need something to keep them busy so it was hard to find anything that was geared towards my children's ages so I decided to put something together myself.

First I considered making a busy book but decided that my boys were not really going to sit and complete the activities. So then I got the idea to fill one of our bags with things to keep them busy. Many DIFFERENT things so that they would not become bored within the one hour that we sit quietly during Mass (If you have a child with ADHD or Autism, you may be able to relate). So, here is what I came up with:


1. Coloring Books and pages printed from the internet. I try to rotate these during different liturgical seasons and feasts of the church. For example, in the picture, I have coloring books about the Passion of Christ- I am changing out the Lent stuff today and am going to print some great Easter/Communion stuff for April/May. Need some freebies to print? Check out these great free resources:

Holy Heroes- I print a lot of stuff from here. During thier Lenten, Advent, and Summer Adventures, there are tons of freebies available. Check in often for some free samples,too. I have also purchased some of thier coloring books~ great high-quality books!

St. John The Baptist Catholic Church Religious Ed Department- a coloring page for almost any Catholic topic you can imagine!

Catholic Toolbox- has links to lots of handwriting coloring sheets and other great printables for your Mass Bag!

Catholic Kids Weekly Mass Bulletin- a great way to catechize your children while keeping them quiet!

Check out my "Catholic Kids" Pinterest board for tons of freebies that I collected all over the web!


2. Small Linking Toys or Kids Meal toys that are appropriate. The linking toys in the photo are actually kids meal toys from Wendy's. I combined the boys toys to create a mini playset. These are great for quiet building.


3. Catholic Games that only require one player. You don't want your kids mingling with one another- or worse- with someone else's kids while they are supposed to be reverent. I have some Patron Saints Catholic Cardlinks pictured above but there are also some online freebies you can use to create something great for your kids!

Saint Joseph Memory Match Game- print two sets and put them in a ziploc

The Good Shepherd Number Order Game Use this game to practice putting numbers in order

Christian Sticker Matching Game I just bought a few more packages of these stickers from Dollar Tree before they are gone. They seem to reappear during Lent... If you cannot get them there, perhaps you can split with someone and purchase them from Autom.

4. Other Stuff like crayons, stickers, blank paper, Religious Ed leftovers, etc.

These bags can be adjusted according to your child's age and attention level. I know some people may disagree with the idea of a child doing anything but sitting in the pew quietly (believe me, I have met my fair share in my own parish) and I believe that children should eventually learn to be as quiet and reverant as we adults. Until then, I will be in the "training room", doing just that- training my boys.


Thanks for stopping by! Alicia

Sunday, April 29, 2012

First Communion Cake Tutorial


Today was my middle son's first Communion day! We attend a small church so there were only 5 First Communicants. At a nearby church, there were 150! Amazing!

I made my son's cake using ideas that I pinned on Pinterest and then I added a few of my own ideas to create this gorgeous cake:


Want to make your own? Here's how:

First bake 24 cupcakes and cool them in the refrigerator. Then make some buttercream icing (or buy it). I used a recipe from Wilton to make my own buttercream icing. The recipe turned out perfect. I made two batches, one white and one blue. I had lots of blue left over!

 Next, you need a cake board to put this HUGE cupcake cake onto. I made my cake "board" from cardboard pieces glued together and then covered with fabric. I then taped some wax paper over the fabric for a beautiful background.

Now assemble your cake. Using a dab of icing on the bottom,"Glue" each cupcake to your board. Form a cross by placing sixteen cupcakes in 8 rows of two going vertically down my cake board. Then added four on each side to finish the cross.

Next, take the white icing and plop tons of it on top of the cross. Spread the icing, carefully ensuring that each cupcake is covered and that there are no visible gaps between the cupcakes. Using a large star tip and icing bag, just spread some blue icing to outline the cross. Using a smaller star tip and white icing, make stars to represent the rosary beads next to the cross. Leave a gap between every decade for a large star "bead". Use the large tip and blue icing to create the bigger beads and to write words. Lastly, I used some icing to "glue" my chocolate cross to my rosary and my chocolate chalice to the top of the cake. It was hard to see the white chalice so I trimmed it with some blue icing.

Thanks for stopping by! Alicia
Skip To My Lou

Tuesday, April 24, 2012

Religious Keepsake Box Tutorial


My middle son will be receiving his First Holy Communion later this month. I knew I wanted to create a First Holy Communion gift for him but I was lost as to what I wanted to create. After contemplating ideas, I decided to create a little religious keepsake box using some new papers that I bought at Big Lots this week.

Religious Keepsake Box Tutorial


What you need:

Animal Crackers Stack by DCWV
ModPodge
paintbrush
scissors/paper cutter
small wooden box (bought mine at Dollar Tree!)
Jesus sticker (also from Dollar Tree)
sandpaper

What to do:


First I traced the top of my box onto the wrong side of the paper I used for the lid and cut it out. Then I cut strips of paper in the width needed for the sides. My strips do not go all the way around. I opted to stop them at the back (because they weren't long enough and the hinges are in the way anyway). I assembled these pieces before moving on to the inside.

I used a paintbrush and ModPodge to coat the top of the box and the back of the paper and then pressed the paper onto the lid. I made sure that any overlap was evenly distributed around the box. Allow that to cure for a few minutes before moving on. Using sandpaper, gently sand the overlapping edges down the sides of the box. Sand them off completely if possible.

I then repeated the above step to do the sides. I also used some binder clips to hold the paper on the sides while they cured.

You can now coat the entire outside of the box with ModPodge and allow to dry. After dry, begin on the inside...

I measured my inside and it was approx. 2 1/4in x 3 3/4in. I cut two pieces of paper this size (one for top insert and one for bottom). Using ModPodge, attach the papers to the inside of the box.

Before sealing the inside pieces, I decorated the top insert with my stickers. I used a "WILD" sticker that came with my paper stack and then printed a label that said "ABOUT" using my label maker. Finally I matted my Jesus sticker (I chose the one with the Eucharist for my First Communicant!) and attached it.

Using the ModPodge, seal the interior of the keepsake box. Allow to dry completely.

There are many things that can go inside this little box. Some ideas that I have are:

Rosary
Holy Card and Medal
Crucifix Necklace
Scapular

Can you think of anything else that would fit well in this little box? Let me know in the comments below!


EDITED TO ADD:
Here is my son with his box:


Thanks for stopping by! Alicia

I linked this free Jesus craft to:
Skip To My Lou

Monday, March 19, 2012

Portable Medicine Cabinet


Have you ever been at work, Wal-Mart, in the car and had a headache and no ibuprofen? Have you had a sudden attack of acid reflux and had no antacid? Have you had a sneezing fit and had no allergy meds? I have, too!

I got so tired of never having my appropriate meds that I finally created this portable medicine cabinet to keep in my purse!


I used an old craft container but a daily medicine box will work great. You can often get those boxes free or for a $1. I pulled out my label maker and labeled each section with the name of the medication that I am putting in the section. I made a section for:

1. Tylenol (Motrin, Ibuprofen gives me ulcers)
2. Excedrine (I have a tendancy to get migraines)
3. Allergy (I put some Chlortabs from Wal-Mart and then I found some generic Zyrtec at Wal-Mart for 88 cents!)
4. Zantac
5. Tums (Yeah, I have a bad stomach)
6. Cold Medicine (I don't need it right now but reserved it for later)
7. Extras


Now you can easily get to your clearly labeled medications tucked neatly inside your purse without adding any bulk.


Thanks for stopping by! Alicia

Sunday, March 11, 2012

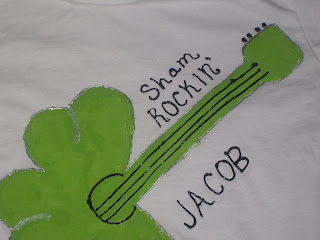
ShamROCKIN' T-shirts Tutorial


Saturday is St Patrick’s Day! Yes, already! To get prepared for the big day (I live in a town named Dublin so you can imagine how popular this holiday is!) I wanted to create some t-shirts for my boys. It is not very often that I can create clothing for my growing boys.
I saw this adorable shirt on Pinterest and knew I had to DIY one for my boys. I bought some white shirts at the Dollar Tree (I was actually hoping for a light green or gray but I can be too choosy for $1). Everything else was already in my stash from previous projects.
Here’s the details:
Items needed:
1 light color t-shirt
Acrylic or fabric paints in the following colors: Green (I used Apple Green acrylic paint), white, black, and silver
Medium tip paint brush
Pencil and paper
Scissors


How to:
Using pencil, paper, and scissors, fold your paper in half and draw half a heart. Cut out heart and hold against shirt to be sure it is not too big. If it is, fold it in half and cut it down a bit.

Now, using your pencil, trace your heart onto your shirt starting with the center heart. Shift your heart to either side and trace it again. Shift the heart once more to the opposite side and trace once more. Using your pencil, freehand (or you can use a ruler) the guitar handle and words.


Now it’s paint time! Using your green paint, gently outline the shamrock and then fill it in. After it dries, mix some green paint with white to create a slightly lighter shade of green. Using the lighter shade, fill in the handle of the guitar, forming a semi circle over where the shamrocks meet (on my shirt, it is outlined with black).


After the lighter shade of green dries, it is time to add the details. I used the black to outline the semi circle and to create the guitar strings. Once again, I free-handed but you can use a ruler for the strings. I also used the black for writing the words. Lastly, I used the silver to outline the entire guitar and I used a bit to create some shading on the leaves of my shamrock.


Let everything dry and, Viola! You have a ShamROCKIN’ shirt!

PS If you look closely you can still see my pencil lines, I am planning to use a spray carpet cleaner to get the lines off before they wear them. I could wash it but Im a little scared ;)

Skip To My Lou
Thanks for stopping by! Alicia

Friday, March 2, 2012

Happy Birthday Dr Seuss!! (and recipe!)

My son's silly face. He is holding my copy of Green Eggs and Ham from when I was a little girl!

Today is Dr. Seuss's Birthday!! My youngest son will be participating in a parade today and I will be posing as the famous cat (the one in the hat!) at my center today. I also made some yummy chocolate green eggs for my son to share as he goes to school looking a lot like "Sam I Am". 
 Chocolate Green Eggs:
White chocolate bark
green m&ms

Using a double boiler, the microwave, or my prefered method, a small pot inside a large pot of boiling water, melt 4 squares of chocolate bark. Using a regular teaspoon, dip out some chocolate and tap the spoon lightly on some waxed paper. Add a green m&m (upside down!) to the top and you have some very simple and delicious treats!

Makes about 30 candies

Skip To My Lou
Thanks for stopping by! Alicia

Thursday, March 1, 2012

Sam I Am Costume


I was originally planning to post a tutorial but instead I will post photos of my son's Sam I Am costume. The reason? I kind of played it by ear the entire time so I have no measurements or anything for you. I used a large yellow t-shirt I found at the Dollar Tree for the base piece and felt for everything else. The platter is an old cardboard pizza round that was saved from recycling. I also used a plastic fork from a takeout plate for the ham. Hot glue held it all together.


Skip To My Lou

Thanks for stopping by! Alicia

Sunday, September 4, 2011

Catholic ABC plaque


When I was preparing to start back to work at Head Start, I created this awesome $3 ABC plaque for my wall. I loved it so much that when I saw these Catholic ABC's, I wanted to create a Catholic set. I didn't know what I was going to do with them and I quickly set the idea on the backburner.

Well, I was perusing the church bulletin last week and noticed an ad looking for REP teachers. I have been feeling like God has been calling me to teach religion for a while but I never felt "ready" until now. I called and I am now officially a fourth grade REP teacher!

Even though my children will be well past learning thier ABC's, I think it would make a cute decoration for my classroom. I used the same technique as with the "regular" ABC plaques with the exception of the following:

I used the Catholic A-Z posters from "That Resource Site". I printed them as 3x5 sheets of photo paper and then cut them out, leaving the bottom part off.

I used some plaques that were on my wall in the kitchen before I created my plates (I haen't posted them yet!) I also found them in the Dollar Tree.

Here are the results- My Catholic Alphabet Craft:


Thanks for stopping by! Alicia

I am linking up to CatholicIcing's First Friday Link Up!

Wednesday, August 31, 2011

Scheduling Link-Up


As I mentioned the other day, I am participating in a "Scheduling Link-Up" over at Catholic Icing. I posted about my plans for my schedule and showed you the areas I need to work on. Well, I do not do well with time based schedules so I created a "Checklist" style schedule instead. I thought of using my computer but I thought it would be fun to create my own with pen and paper.

On my schedule, I listed the daily activities that I need to accomplish. These are things in addition to my normal work like doing to work, coming home, and cooking dinner. As you can see, we are a home-based family- we do not have a lot of sports and extra-curricular things going on.

I made sure to include some places for my plans. I am wanting to focus on a Bible verse each week and a character trait. I also added a place to plan my crafts, reading, and research. By research, I mean my teacher stuff and Pinterest searches. I also left room for "special things to remember"- these are things that I want to remember but do not need to be checked off. Lastly, there is a blank space for whatever strikes my fancy! I am hoping to put this schedule to good use. Feel free to print a copy yourself.

Thanks for stopping by! Alicia

Thursday, July 28, 2011

50 cent Pen Caddy

I found it! My MoJo is back!!

I was looking around in my craft area for something to create today when I came across a bunch of metal buckets I bought at Dollar General YEARS ago for 50 cents each (maybe cheaper, I can't remember!). They came in purple or black with glitter circles all over them. They were a Halloween decoration placed on clearance when I bought them. They sat in my mom's house for a few more years until she threw them away and I dug them out of the trash we came across them and I took them home to live in my closet for another 4 years!

I originally wanted to cover the bucket with some patterned paper and use it to hold my pens for my sign-in sheet at work (as a Head Start teacher). I couldn't figure out how to just attach a piece of paper around the bucket. And that's how the project began.....

I started out with some patterned paper from the "Nana's Kids" stack from DCWV, scissors, modpodge, and a bucket. I cut the patterned paper into squares using the pattern in the paper as a guide. Then I covered a part of my bucket with modpodge and coated the back of the first piece with Modpodge. I pressed the piece on and then brushed Modpodge over the top. I made a pattern with my pieces and covered all of those glittery dots.


I let that dry and then pulled out my ribbon! I chose all the ribbons that looked like they would coordinate with my bucket.


I tied ribbons around the handle. I made sure to keep it even visually by tying a ribbon on the left when I tied one on the right. I used the thin pink ribbon more generously than the other colors because it was thin and also my only pink! (I didn't use all of the ribbons pictured)


Now, if you know me, you know that good enough is never enough! I decided I needed some personalized pens to go inside the bucket!

You can buy some "RSVP" pens pretty inexpensively and put your patterned paper INSIDE the barrel of the pen. I did something a little different because:
                       a. I wanted to personalize them with a "return to:" label
                       b. I wanted to use cheap pens I already own bacuse they will
                     eventually walk off even with my name on them!

 So I got some patterned papers together (I actually didn't use the ones pictured because they were so thick that I decided to use something thinner and easier to wrap around a pen! I printed the "return to:" labels on Microsoft Word in an 8 point Arial font. I cut them into tiny little strips. I also cut my patterned paper into 4x1-3/4 inch strips.


I then used my adhesive to adhere the patterned paper to the outside of each pen. I cut a 4 inch strip of packing tape and wrapped it around the pen. I cut the excess off with a pair of sharp scissors. I then poured some clear acrylic stones in the bottom of the bucket to hold the pens upright and to make them "stick up" out of the top of the bucket.

This is a close up of my little personalization. What do you think?


Thanks for stopping by! Alicia
Related Posts Plugin for WordPress, Blogger...